A short practical guide on how to begin a chatbot and program its behaviour
Source: Ant Rozetsky on Unsplash
Chatbots are great virtual assistants that come in pretty handy at automating tasks and waiting for orders. You can see them as pieces of software that can “talk” to humans by receiving, processing, and forwarding information in a chat environment.
They can easily perform helpful “work” for us by repeating tasks and responding to user inputs. Automating tedious and repetitive tasks using chatbots makes them really helpful for companies and individuals.
☑︎ There are many ways a chatbot can be a helpful assistant. You can use one to:
- forward yourself or others information on a scheduled basis
- send messages, images, videos, files, etc.
- keep track of your to-do list and remind things
- find information faster, and “easier”
- to make payments, play games and many other things...

For this project, we will be using:
-
Python Telegram Bot API: to configure the bot and process the messages that we send.
-
The Telegram app: for messaging and access to the python bot remotely and to have a chat.
Let’s set things up!
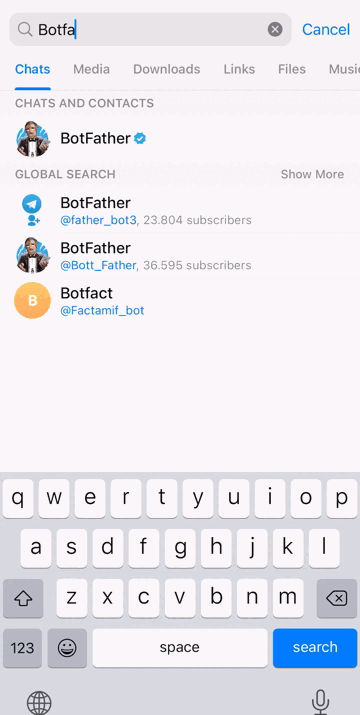
On Telegram, we need to interact with a bot to create our own bot. That’s right! We need to speak with the BotFather. The botfather is your go-to bot to make your own bots in Telegram and will guide you through the creation process and how to manage them.
Source: Lana Codes on Unsplash
- Open the telegram app and type @botfather on the search bar, then click on the bot to enter a new chat.
- Create a new bot by sending the command
/newbotand following the instructions. - Now copy the bot token and have it available. It should look something like this:
5415430506:AAFJ0PDIpS2F8LKy2JT7aRluXpT_Kvz4p2 - Finally, open a chat with the bot and send
/start.
Keep your token secure and store it safely, it can be used by anyone to control your bot.
If case you no longer need the bot, you can send the command /deletebot to the botfather to get rid of it.
Essentially all we’ll be doing is tell the bot what it needs to do, once a message has been received. So we will be binding some text that we send, into bot actions. This is all a basic chatbot should be able to do!
We will be going step-by-step, but if you are feeling lazy you can download the repo here.
Install the python-telegram-bot package by running:
pip install python-telegram-bot -U --preThe python-telegram-bot library has a great deal of functionality and is very actively developed! After undergoing many changes through its development, at the moment the process has become quite simple to set up!
All we have to do to start is create a: Telegram.ext.Application
Define the bot app
On a new file bot.py, use this snippet to create an empty bot app:
from telegram.ext import Application

BOT_TOKEN = "<YOUR_BOT_TOKEN>"
bot = Application.builder().token(BOT_TOKEN).build()

# start and poll for updates, press CRTL+C to stop
bot.run_polling()
You can run it as:
# run bot - press CRTL+C to stop
python3 bot.py
Although it can’t do anything yet, the Application (instanced as bot ) is able to handle any updates (text, audio, media) that are sent to the bot, all we have to do is specify some handlers to act upon them.
Source: Monty Allen on Unsplash
To turn our bot into something useful, we need to define some handlers (code) so that it can act upon the messages that we send.
The library has two very useful types of handlers:
-
A
CommandHandler: which triggers when a specific /command is received. -
And a
MessageHandler, which triggers when certain filters are met (e.g when a media file or unknown command is received).
Once they trigger, they will execute a function that you specify, allowing the bot to act upon receiving certain messages.
To assign a command to the bot using a CommandHandler you need a:
- command name,
- and an async function to execute
As an example, let’s add a CommandHandler to our script bot.py, that will trigger the function respond_hello, when we send /hello to the bot.
from telegram.ext import Application, CommandHandler, CallbackContext
from telegram import Update


# 1. create async function

async def respond_hello(update: Update,
                        context: ContextTypes.DEFAULT_TYPE) -> None:
    """Send a message when the command /hello is issued."""
    user = update.effective_user
    # bot replies to the message sending a string with the username
    await update.message.reply_html(
        f"Yoo {user.username}!",
        reply_markup=ForceReply(selective=True),
    )
As you, see the handler functions accept two arguments a telegram.Update object and a telegram.ext.CallbackContext.
These are provided automatically when the handler is triggered, so there is no need of defining them yourself. They contain useful data and properties.
Now let’s add it to our application, we will trigger therespond_hello function when the command /hello is received:
BOT_TOKEN= "<YOUR_BOT_TOKEN>"
bot = Application.builder().token(BOT_TOKEN).build()

# 2. Bind the handler function. We will be adding more handlers below...[!]
bot.add_handler(CommandHandler("hello", respond_hello))

# run app press CRTL+C to stop
bot.run_polling()
Let’s run the script again to see the changes:
python3 bot.py

Sending your first command /hello to the bot. The bot executes the function respond_hello in response, greeting the user
To configure the bot so that it responds to more complex input, we want it to process the additional text sent with a command.
As a simple example, let’s assign the bot a command /sum that sums all numbers given to it.
- To do this, we must retrieve the data sent along the command by accessing context.args in the handler function.
- This returns a list of string arguments.
- We call isdigit() on each argument to isolate only the numbers, that we sum up.
- To have the bot send a message, we use the send_message method found in context.bot . The method receives the chat_id of the chat between you and the bot and some text.
async def compute_sum(update: Update, context: ContextTypes.DEFAULT_TYPE):
    result = [arg for arg in context.args if arg.isdigit()]
    await context.bot.send_message(
        chat_id=update.effective_chat.id,
        text=f"Sum of given numbers is: {sum(map(int, result))}.")

# add the handler to the bot app
bot.add_handler(CommandHandler("sum", compute_sum))
After running the script again, we see that our bot is now able to sum the given numbers, ignoring the rest:
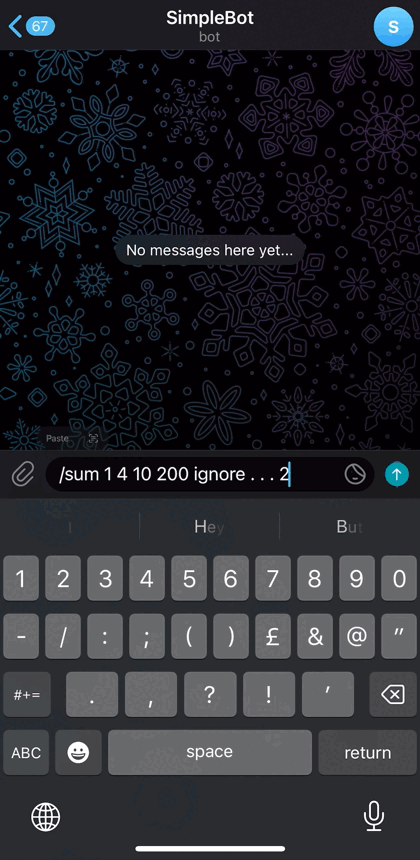
Calling the `/sum` command with arguments. To perform the sum, all arguments that aren’t digits are ignored.
This is a simple example, but the main idea is to utilize the context.args in our handlers, to give our bot command access to the data sent by the user.
Another useful method for the bot is the ability to send any type of file up to 50Mb to the user using the bot.send_document function. It receives the chat_id and the file path or the URL of the document to send. In this example, we will pass in a URL that returns random images. And assign it to the command /random_image.
async def random_image(update: Update, context: ContextTypes.DEFAULT_TYPE):
    chat = update.effective_chat
    seed = random.randint(1, 100)
    if chat:
        await context.bot.send_document(chat_id=chat.id, document=f'https://picsum.photos/seed/{str(seed)}/200/300')

# add the handler to the bot app
app.add_handler(CommandHandler("random_image", random_image))
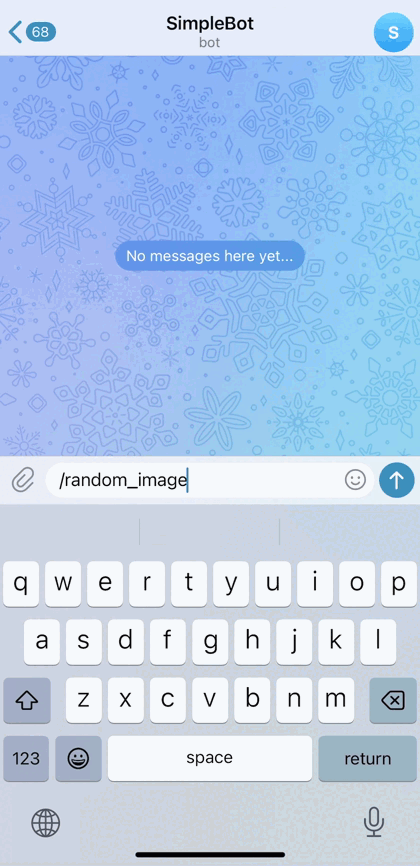
Bot sends random images based on the /random_image command
The send_document function can be used for sending any type of file. So we can use it to transmit any results or information to the user, like images, videos, gifs, PDF’s, excel sheets, etc.
Another handy functionality of telegram bots is the ability to return a custom keyboard to the user, where we can have the user quickly interact with predefined inputs. To turn these keyboards into something more useful, you can have them list options for existing commands, so they can act as simple interfaces for certain functionalities of your bot. In this example, we will do a simple menu that displays some custom calls for our sum command of the previous section.
from telegram import ReplyKeyboardMarkup
from telegram.ext import CommandHandler, ContextTypes

async def return_keyboard(update: Update, context: ContextTypes.DEFAULT_TYPE):
 # you can add multiple options here
    custom_keyboard = [['/sum 1 1', '/sum 2 2'],
                   ['/sum 3 3', '/sum 4 4']]
    reply_markup = ReplyKeyboardMarkup(custom_keyboard)

    chat = update.effective_chat
    if chat:
        await context.bot.send_message(
            chat_id=chat.id,
            text="Custom Keyboard Test",
            reply_markup=reply_markup
        )

# add the handler to the bot app:
app.add_handler(CommandHandler("sum_keyboard", return_keyboard))
Clicking on a button on the keyboard will send the choice to the bot and have it process it. As we call the /sum command it is executed.
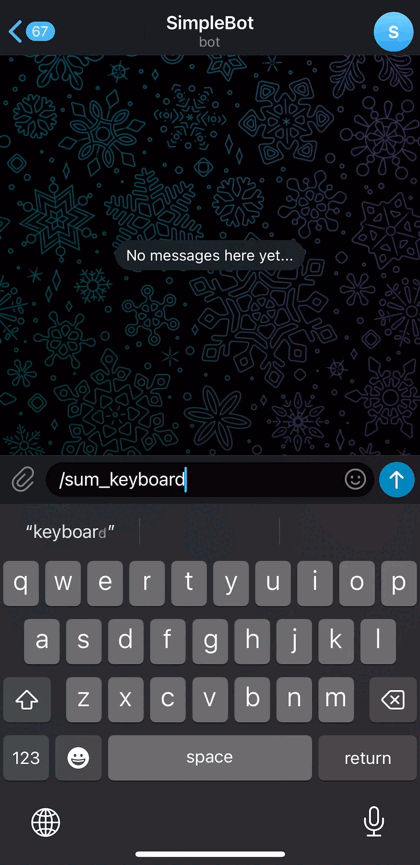
Replying a custom keyboard to the user, on /sum_keyboard command. Clicking on a button sends the choice back to the bot, running the /sum function. This illustrates a handy property of keyboards.
Let’s now take a look at the second type of handlers, which don’t trigger on certain /commands but respond to the type of media that they receive.
To assign a command to the bot using a MessageHandler you need a:
- filter
- and an async function to execute
The main idea is that all messages that satisfy our selected filter will run the handler function. By using different types of fillters like TEXT, PHOTO, VIDEO, VOICE you can have the bot interact with the user-input in multiple, dedicated ways.
In this simple example, the bot will notify the user in case a given command is not properly understood
- To do this we pass a
COMMANDfilter to ourMessageHandler.
from telegram.ext import Application, CommandHandler, ContextTypes, MessageHandler, filters

async def unknown_command(update: Update, context: ContextTypes.DEFAULT_TYPE):
    chat = update.effective_chat
    if chat:
        await context.bot.send_message(
            chat_id=chat.id,
            text="I don't recognize this command")

# add the handler as the last one...:
app.add_handler(MessageHandler(filters.COMMAND, unknown_command)) # runs when command is not found
With this filter, messages with commands that couldn’t be recognized will run our unknown_command function:
Bot replies to an identified command by the user
That’s it! Thanks for reading it all the way.. We’ve learned how to create a chatbot and have it:
- respond to user commands by running
CommandHandlercallbacks. - send messages and files back to the user
- utilise command arguments (user input) to execute the function using
context.args=process messages based on their type by runningMessageHandlercallbacks.
If you are interested in learning more, here are some useful links:
I’ve placed some additional snippets in the repo, so make sure to take a look. I hope that it helps you start your own projects with bots!
After you have created a telegram bot using @botfather, retrieve its API key and paste it at the beginning of bot.py. That's all you need to do get started.
To install the project dependencies, run:
chmod +x install.sh
./install.sh
or execute:
# install virtualenv
pip3 install virtualenv
# create a virtual environment folder
python3 -m venv env
# activate env and install dependencies
source env/bin/activate
pip install python-telegram-bot -U --pre
To start the bot, run:
chmod +x run.sh
./run.sh
or execute:
source env/bin/activate
python3 -i main.py
source deactivate
This should start a basic customizable bot able to:
- respond to user commands by running
CommandHandlerfunctions. - Utilize command arguments to execute code using
context.args - process messages based on their type by running
MessageHandlerfunctions.