在依赖收集章节,我们实现了在数据更新后自动更新视图。但是这样当用户不停的更新数据时就会不停地进行视图更新,显然这是很耗费性能的。
Vue在数据修改后,并没有直接更新视图,而是将视图更新的方法放到异步任务中执行。本文将详细讲解具体的更新过程,并手写实现Vue的异步更新逻辑相关代码。
这里先回顾一下依赖收集的相关知识:
- 页面首次挂载,会从
vm实例上获取data中的值,从而调用属性的get方法来收集watcher - 当
vm实例上的属性更新它的值时,会执行收集到的watcher的update方法
看下之前完成的代码:
class Watcher {
  // some code ...
  update () {
    // 直接执行更新操作
    this.get()
  }
}那么watcher的update到底应该如何被执行呢?这就是本文的重点。
watcher的更新操作主要分为如下俩步:
- 将
watcher去重后放到队列中 - 在异步任务中执行存放的所有
watcher的run方法
代码如下:
class Watcher {
  // some code
  update () {
    queueWatcher(this);
  }

  run () {
    this.get();
  }
}

export default Watcher;

let queue = [];
let has = {}; // 使用对象来保存id,进行去重操作
let pending = false; // 如果异步队列正在执行,将不会再次执行

function flushSchedulerQueue () {
  queue.forEach(watcher => {
    watcher.run();
    if (watcher.options.render) { // 在更新之后执行对应的回调: 这里是updated钩子函数
      watcher.cb();
    }
  });
  // 执行完成后清空队列
  queue = [];
  has = {};
  pending = false;
}

function queueWatcher (watcher) {
  const id = watcher.id;
  if (!has[id]) {
    queue.push(watcher);
    has[id] = true;
    if (!pending) {
      pending = true;
      // 异步执行watcher的更新方法
      setTimeout(flushSchedulerQueue)
    }
  }
}此时已经实现了视图的异步更新,但是Vue还为用户提供而了$nextTick方法,让用户可以在DOM更新之后做些事情。即$nextTick中的方法会在flushSchedulerQueue
执行后才能执行,下面就来看下$nextTick和视图更新之间的逻辑。
在queueWatcher中其实并不是直接调用setTimeout来进行视图更新的,而是会调用内部的nextTick方法。为用户提供的$nextTick方法,也会调用nextTick方法。该方法实现如下:
let callbacks = [];
let pending = false;

function flushCallbacks () {
  callbacks.forEach(cb => cb());
  callbacks = [];
  pending = false;
}

export function nextTick (cb) {
  callbacks.push(cb);
  if (!pending) {
    pending = true;
    timerFunc();
  }
}nextTick会接收一个回调函数,并将回调函数放到callbacks数组中,之后会通过timerFunc来异步执行callbacks中的每一个函数:
let timerFunc;
if (Promise) {
  timerFunc = function () {
    return Promise.resolve().then(flushCallbacks);
  };
} else if (MutationObserver) {
  timerFunc = function () {
    const textNode = document.createTextNode('1');
    const observer = new MutationObserver(() => {
      flushCallbacks();
      observer.disconnect();
    });
    const observe = observer.observe(textNode, { characterData: true });
    textNode.textContent = '2';
  };
} else if (setImmediate) {
  timerFunc = function () {
    setImmediate(flushCallbacks);
  };
} else {
  timerFunc = function () {
    setTimeout(flushCallbacks);
  };
}timerFunc对异步API进行了兼容处理,分别会先尝试使用微任务Promise.then、MutationObserver、setImmediate
,如果这些API浏览器都不支持的话,那么会使用宏任务setTimeout。
在queueWatcher里我们将flushSchedulerQueue作为参数执行nextTick:
function queueWatcher (watcher) {
  const id = watcher.id;
  if (!has[id]) {
    queue.push(watcher);
    has[id] = true;
    if (!pending) {
      pending = true;
      nextTick(flushSchedulerQueue);
    }
  }
}在Vue原型上,也要增加用户可以通过实例来调用的$nextTick方法,其内部调用nextTick:
Vue.prototype.$nextTick = function (cb) {
  nextTick(cb);
};$nextTick会将用户传入的回调函数也放到callbacks中,通过异步API来执行。
上面已经讲解了视图更新和$nextTick的实现代码,接下来写一个demo来实践一下。
下面是实际开发中可能会用到的一段代码:
<div id="app">{{name}}</div>
<script>
  const vm = new Vue({
    el: '#app',
    data () {
      return {
        name: 'zs'
      };
    }
  });
  vm.name = 'ls';
  console.log('$el', vm.$el);
  vm.$nextTick(() => {
    console.log('next tick $el', vm.$el);
  });
</script>
其输出结果如下:

在了解了$nextTick的具体实现后,我们详细分析下代码的执行流程:
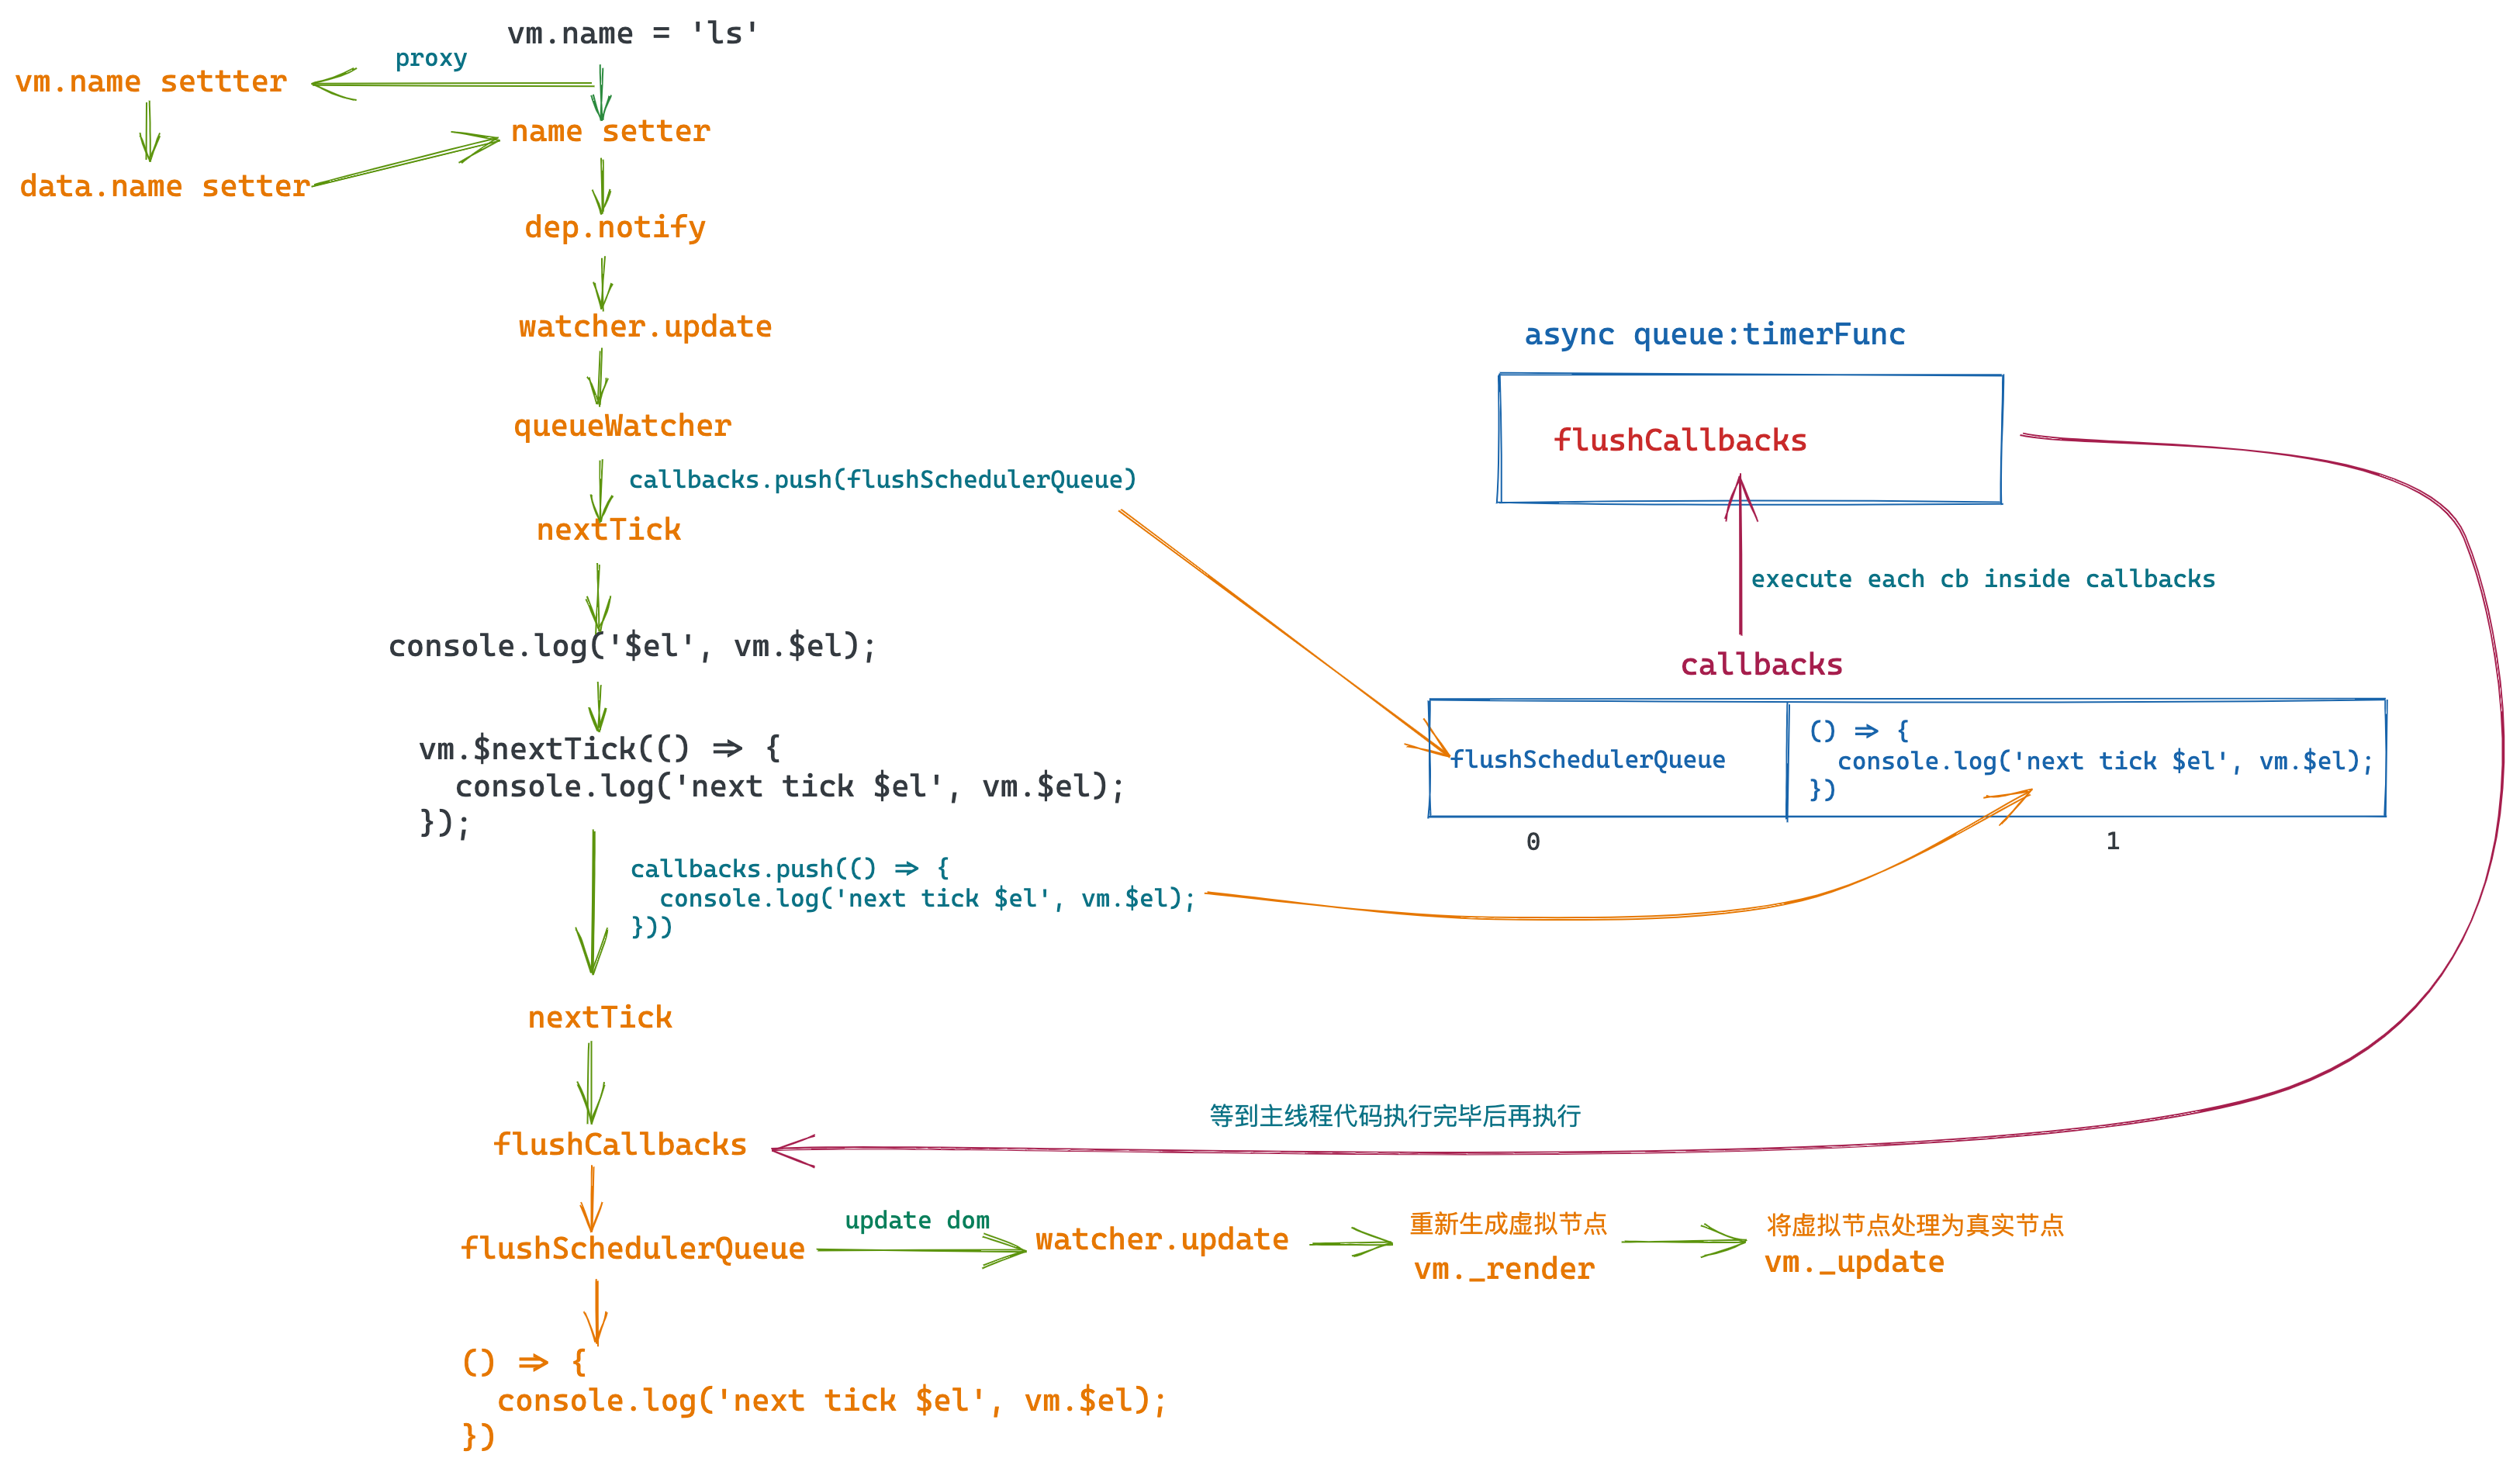
- 在修改值之后,我们将要更新的
watcher队列放到了flushSchedulerQueue函数中来执行 - 而
nextTick将flushSchedulerQueue放到了callbacks中,通过异步任务来执行flushCallbacks - 由于异步任务要等到主线程中的代码执行完毕后才会执行,所以此时先打印
vm.$el,视图尚未更新 - 接下来会继续执行
vm.$nextTick,将vm.$nextTick中的回调函数也放到了callbacks中,但是其位置在flushSchedulerQueue后边 - 主线程中的代码执行完毕,开始执行异步任务
flushCallbacks。首先执行flushSchedulerQueue更新DOM,然后再执行$nextTick中的回调函数,此时回调函数中可以获取到最新的DOM
文章的相关资料如下:
希望在读完本文后,小伙伴们能对Vue的异步更新有更深的理解。