%20(1)_page-0003.jpg)
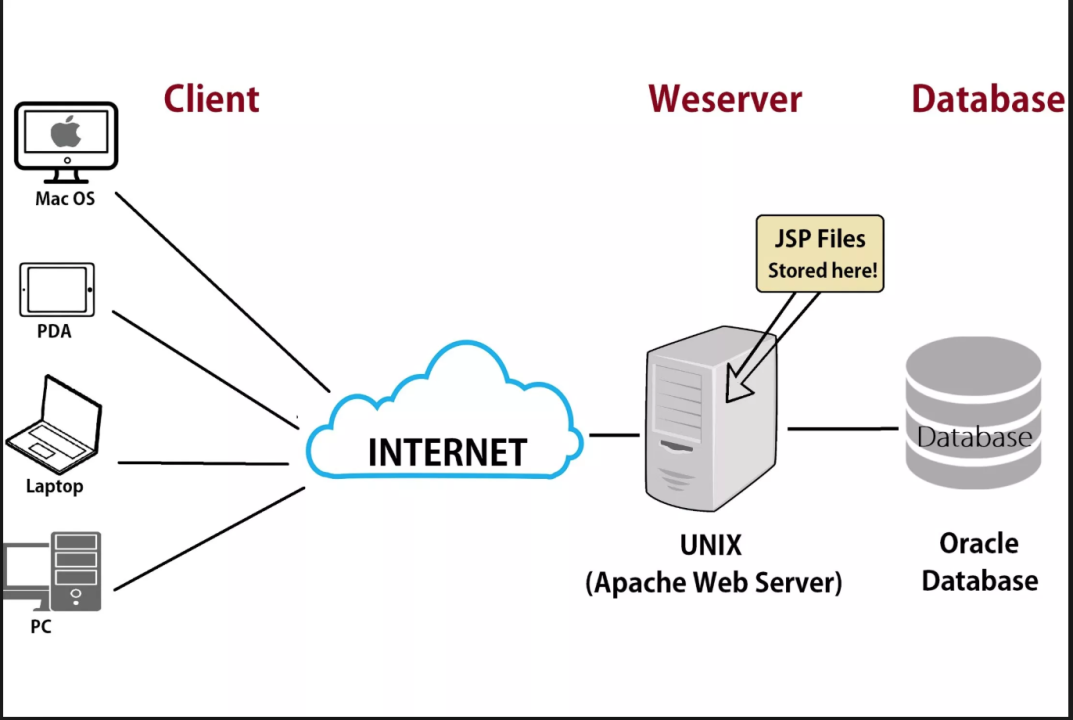
➔ Like i have smartphone and i am sending "hii" msg to anyone then what happend here ??
➔ it converts into data packets which are invisible for human and they go to the nearest tower / ISP
➔ Then tower receive data packets and convert them into electrical signals
➔ these electrical signals goes to any other country through optical fibers through ocean
➔ then the same electrical signals goes to Tower in other country then converted into data packets
➔ data packets received by user
➔ for small area , sended HII msg that converted into packets then it goes to tower / ISP ( internet service provider like JIO,AIRTEL,VI ) then same process as above
➔ this ecosystem known as Internet more info chatGpt
➔ mobile has ip address and mac address
➔ but when we connect with router at that time it uses Mac address
➔ A server is a computer or a software system that provides services, resources, or functionality to other computers or programs, often referred to as clients.
➔ if any computer is connected with internet and it programmed to accept Request and it can give Response.
➔ computer + programmed + connects with internet = server
➔ Client-server architecture = client jo request send karta hai and Server jo response bhejta hai
➔ Serverroom has just many CPUs
➔ hyper text transfer protocol / secured
➔ protocol hai jiske basis par internet surf karne ki aazadi milti hai - data ka aana jaana iski wajah se ho raha hai
➔ if any web has HTTP means not secured then the packages sended by the device can be seen by anyone by using hacking devices because data is not encrypted
➔ HTTPS data packages are also captured by anyone but the data are encrypted so there is no meaning of this
➔ server par commumication k liye port hote hai - port par server listen karta hai
➔ ports are just numbers
➔ chatGpt
➖➖➖➖➖➖➖➖➖➖➖➖➖➖➖ ➖➖➖➖➖➖➖➖➖➖➖➖➖➖➖
➔ create folder then go into this folder using terminal
➔ npm init or npm init -y to create package.json file
➔ npm i express to create nodeModule file
➔ then create server.js file
// 📂 server.js

// 1) server instantiate
const express = require('express');
const app = express();

// 2) server live

app.listen(3000, ()=>{
    console.log("server started at port number 3000");
})

// here 3000 is port number from where our server can do communication or listen
➔ Routes
const bodyParser = require('body-parser');   // used to parese req.body in express -> PUT or POST
app.use(bodyParser.json() );   // specifically parse JSON data & add it to the request.Body object

// here "/" is route

app.get('/',(request,response)=>{
    response.send("Hello jee, kaise ho");
})


app.post('/api/cars', (request,response)=>{
    const {name, brand} = request.body;
    console.log(name);
    console.log(brand);
    response.send("car submitted successfully");
})
➖➖➖➖➖➖➖➖➖➖➖➖➖➖➖
➔ connects mongoDB database and expressJs server using MONGOOSE ( ODM library - object document model )
➔ in expressJs server data treats as object and in mongo data treat as document
➔ npm i mongoose install
const mongoose = require('mongoose');
mongoose.connect('mongodb://127.0.0.1:27017/testDb',{
    useNewurlParser : true,
    useUnifiedTopology : true
})
.then(()=>{console.log("connection successfull between express server with mongoDB")})
.catch(()=>{console.log("error")})


// here testDb is db name that we have created in the mongodb compass➔ chatgpt
➖➖➖➖➖➖➖➖➖➖➖➖➖➖➖ ➖➖➖➖➖➖➖➖➖➖➖➖➖➖➖ ➖➖➖➖➖➖➖➖➖➖➖➖➖➖➖
➔ Node.js is a runtime environment that allows you to execute JavaScript code on the server-side. In simple terms, it enables you to use JavaScript for server-side programming, not just in web browsers
➔ runtime + apis
➔ runtime environment for Js + apis
➔ asynchronous
➔ non blocking I/O
➔ Is it web-server? -- No but you can make it using ExpressJs
➔ Why Node is used in webserver? -- Heavy I/O + small code footprint
➔ Running any JavaScript file from node using node filename.js
➔ Modules are basic containers or functions in Node/JavaScript system. 1 file can be one module in Javascript.
➔ export
// 📂 module.js

function sum (a,b){
    return a + b ;
}

exports.sum = sum ;

//----------------------------
// other way

exports.sum = (a,b) =>{
    return a + b ;
}


// "exports" ek type ka module he hai like OBJECT
// and "exports.sum" kar ke hum export ke andar sum ki property bana rahe hai
// and then "=sum" means uske andar sum function ko rakh rahe hai
➔ import
// 📂 index.js

const module = require("./module");  // way of import

console.log(module);    // OP => { sum: [Function: sum] }

console.log(module.sum(4,5)); // OP => 9

%20(1)_page-0022.jpg)
➔ 💤 Es6 type import export -chatGPT
➔
- iisme aagar ek function ko he hum export karte hai toh import k time par hum us function ko directly access kar sakte hai tab hame "varName.exportedFunctionName" meaning "." ka use NAHII karna padta hai
- agar ek se jyada function export kiye hai toh hame "." use karna padega jaise ki "varName.function1" and "varName.function2" like
module.exports = xxFunc ;
// here we can directly import
const ImportedxxFunc = require("./config");
console.log(ImportedxxFunc);  //------> function xxFunc(){ .. }
//==========================

module.exports = {xxFunc} ;
const ImportedObj = require("./config");
console.log(ImportedObj);  //---------> { xxFunc : function() }
console.log(ImportedObj.xxFunc); //--------> function xxFunc(){ .. }   // ❌AVOID this type import "." type
// OR
const {xxFunc} = require("./config");

//==========================

exports.xxFunc = () => {...}
const {xxFunc} = require("./config");
➔ create folder then go into this folder using terminal
➔ npm init or npm init -y to create package.json file ( is a configuration file for node projects which has scripts, dependencies, devDependencies etc )
➔ if there is not package.json file available then you cannot use npm install anything to install any online modules available for node on NPM repository online.
➔ npm i express to add express and nodeModule files
➔ after doing this you can see express version in "package.json" file in dependencies
🔥 Dev dependancy - ye sirf development time k liye hai -- ye server k main code se realted nhii hai
➔ ex. NODEMON is a package for running node server and track live changes to re-start again.
➔ npm install nodemon --save-dev installation of devdependency therefore --save-dev
// 📂 package.json
...

  "scripts": {
    "start": "nodemon index.js",
    "dev": "nodemon index.js"
  },

// here index.js means mainFileName.js

...
➔ scripts inside package.json can be used like npm run <script-name> e.g npm run dev. Only for npm start you can avoid run.
➔ use npm install -g nodemon to install packages globally ( --global or -g ) on your system. Not just in the project but useful all over your system.
➔ How to uninstall packages like npm un <package-name> or npm uninstall <package-name>
➖➖➖➖➖➖➖➖➖➖➖➖➖➖➖
➖➖➖➖➖➖➖➖➖➖➖➖➖➖➖
➔ here client send REQUEST(req) to the server and server gives RESPONSE(res)
➔ but server can only understand HTTP protocol as language
%20(1)_page-0004.jpg)
🔥 HTTP requests
➔ Type of Request :: GET, POST, PUT, DELETE etc.
➔ Headers :: Meta data sent by your browser like browser name, cookies, authentication information etc.
➔ Query Parameters (url?name=john) :: This is used in GET requests to send data to server
➔ Route Params (url/john)
➔ Body data :: This is used in POST and other requests to send data to server
🔥 HTTP responses
➔ Response status code :: (200, 404, 403, 502) here 2XX - success, 3XX - redirections, 4XX - client error, 5XX - server error
➔ Response body :: Actual data to be sent to client : HTML, JS, JSON, CSS, Image etc.
➔ Headers :: Meta data sent by your server back to client like server name, content size, last updated time etc.
➔ what is res.setHeader(name,value)
➖➖➖➖➖➖➖➖➖➖➖➖➖➖➖
➖➖➖➖➖➖➖➖➖➖➖➖➖➖➖
%20(1)_page-0006.jpg)
➔ ExpressJS is de-facto Node framework - and used in most Node applications which are used as web server.
➔ You can install express npm install express
🧡 about FS what is filesystem- chatGpt
const fs = require('fs');

const index = fs.readFileSync('anyFile.xtension', 'utf-8');
console.log('File contents:', index);

// ==== OR ====

try {
  const index = fs.readFileSync('anyFile.`xtension`', 'utf-8');
  console.log('File contents:', index);
} catch (error) {
  console.error('Error reading the file:', error);
}
💜 create express server chatGpt
// import express
const express = require("express");
// create APP or SERVER
const server = express();

// res
server.get("/", (req, res)=>{
    res.send("HELLO WORLD");
})

// server ko listen karwa rahe particular port par
// listen matalb jab server k saath communication hoga tab wo RESPONSE send kr dega
const PORT = 3000;   // packets me port bhi send hota hai
server.listen(PORT, ()=>{
    console.log("server started at 3000 port");
})
➔ Response methods (res is our response objects)
server.get('/demo', (req, res) => {

    //res.send('Hello, Express as simple msg');     //  res.send()===> for sending html or txt

    //res.send("<h1>hello in html</h1>");           //  res.send()===> for sending html or txt

    //res.sendFile("/Usera/parth/desktop/03-express-js/index.html");      //  res.sendFile() ==> for sending File

    //res.json(product);       // res.json ==> for sending JSON

    //res.sendStatus(404);     // res.sendStatus(xxx) - for sending HTTP status only

    res.send("hello with status")     // sending multiple ( file + statusCode )
      .status(200);
});


// res.send we can see on our webpage with url "/"➔ API / Endpoints / Routes are used inter-changeably but they are related to server paths.
server.get("/",(req, res)=>{
  res.json({type:"GET"});
})

server.post("/",(req, res)=>{
  res.json({type:"POST"});
})

server.put("/",(req, res)=>{
  res.json({type:"PUT"});
})

server.delete("/",(req, res)=>{
  res.json({type:"DELETE"});
})

server.patch("/",(req, res)=>{
  res.json({type:"PATCH"});
})%20(1)_page-0010.jpg)
➔ Middleware - Modifies the request before it reaches the next middleware or endpoints.
➔ Sequence of middleware is very important, as first middleware is first traversed by request.
1️⃣ Application level : server.use(middleware) for middleware
server.use((req, res, next) => {
  console.log('Middleware function executed.');
  next();
});

//==== OR ====

// for ProductRouter of express
2️⃣ Router level : server.get('/', middleware, (req,res)=>{})
const middleware = (req,res,next) =>{
    // all conditions here
    if(condition){
        res.send("authorized");
        next();
    }
    else{
        res.send("unauthorized").status(400);
    }
}

server.get('/', middleware, (req,res)=>{})

//==== OR =====

const router = express.Router();

// Router-level middleware
router.use((req, res, next) => {
  console.log('This middleware is executed for routes defined on this router.');
  next();
});

// Route definition with router-level middleware
router.get('/', (req, res) => {
  res.send('Response for the root route.');
});
3️⃣ Built-in middleware - chatGpt
// Built-in middleware for JSON parsing and for parsing body data
server.use(express.json());

// for static hosting
server.use(express.static('public'));
4️⃣ External Middle-wares / third party (ex. Morgon )
// npm i morgan

const morgan = require('morgan');
server.use(morgan('dev')); // here "dev" is predefined-method like ➔ req.ip - IP address of client
➔ req.method - HTTP method of request
➔ req.hostname - like google.com / localhost
➔ req.query - for capturing query parameters from URL e.g. localhost:8080 ? query=value
➔ req.body -for capturing request body data (but its needs a middleware for body data decoding)
➔ req.params - for capturing URL parameters for route path like /products/:id
➔ chatGpt ans
➔ coderDost github
➖➖➖➖➖➖➖➖➖➖➖➖➖➖➖
➖➖➖➖➖➖➖➖➖➖➖➖➖➖➖
➔ here we are creating CRUD operation related apis
➔ why below 3 are needed - chatGpt
server.use(express.json()); // Needed to parse JSON data in incoming requests bcz nodeJs ko pata nhi chalta ki wo json data hai === "Content-Type", "application/json"
server.use(morgan('default')); //  When a client makes an HTTP request to your server, morgan logs information like this = " GET /api/user 200 15.123 ms "
server.use(express.static('public')); // Required to serve static files (e.g., HTML, CSS, JavaScript) to clientsconsole.log("start");
// create server
const express = require("express");
const server = express();
//=============================================
// MIDDLEWARES
// body parser that means res will be in json format
server.use(express.json());
// morgan for information
const morgan = require("morgan");
server.use(morgan('default'));
// for server static files
server.use(express.static('public'));
//==========================================
server.listen(3000,()=>{
console.log("server starts on 3000 port");
})
//===========================================
// C R U D
// http://localhost:3000/products
// GET - Read
server.get("/products",(req,res)=>{
res.json({"key" : "value GET json"});
})
// POST - Create
server.post("/products",(req,res)=>{
const body = req.body ; // ye hum POSTMAN se test karte hai "req.body"
res.status(201).json(body);
})
// PUT - Update
server.put("/products",(req,res)=>{
const body = req.body ;
res.json(body);
})
// PATCH - Update
server.patch("/products",(req,res)=>{
const body = req.body ;
res.json(body);
})
// DELETE - Delete
server.delete("/products",(req,res)=>{
const body = req.body ;
res.json(body);
})
// ----- OR ----
const getProductFunction = (req,res) =>{
// write logic
}
server.get("/product", getProductFunction );➔ difference between put and patch- chatGpt
➔ PUT \task\:id : to update a particular task which can be identified by unique id. Data to be updated will be sent in the request body. Document data will be generally totally replaced.
➔ PATCH \task\:id : to update a particular task which can be identified by unique id. Data to be updated will be sent in the request body. Only few fields will be replace which are sent in request body
➖➖➖➖➖➖➖➖➖➖➖➖➖➖➖
➖➖➖➖➖➖➖➖➖➖➖➖➖➖➖
➔ is a pattern in software design commonly used to implement user interfaces (VIEW), data (MODEL), and controlling logic (CONTROLLER). It emphasizes a separation between the software's business logic and display.
➔ Model - Database Schema's and Business logics and rules
➔ View - Server Side Templates (or React front-end)
➔ Controller - functions attached to routes for modifying request and sending responses. It's a link between the Model and View.
➔ without any folder/mvc the code is
console.log("start");

// create server
const express = require("express");
const server = express();

//=============================================
// MIDDLEWARES
server.use(express.json());
// const morgan = require("morgan");
// server.use(morgan('default'));
server.use(express.static('public'));

// 🔥⭕️ product router -- EXPRESS.ROUTER -- MOUNTING 💯💯
const productRouter = express.Router();
server.use("/", productRouter);

// server.use("/xxxx", productRouter);      //==> means "http://localhost:3000/xxxx/products

//==========================================
server.listen(3000,()=>{
    console.log("server starts on 3000 port");
});
//==========================================
// C R U D ops

const getProduct = (req,res)=>{
    console.log("get product working");
    res.json({"key" : "value GET json"});
};

const postProduct = (req,res)=>{
    console.log("post product working");
    const body = req.body ;
    res.json(body);
}

const putProduct = (req,res)=>{
    console.log("put product working");
    const body = req.body ;
    res.json(body);
}

const patchProduct = (req,res)=>{
    console.log("patch product working");
    const body = req.body ;
    res.json(body);
}

const deleteProduct = (req,res)=>{
    console.log("delete product working");
    const body = req.body ;
    res.json(body);
}

productRouter
.get("/products", getProduct)
.post("/products", postProduct)
.put("/products", putProduct)
.patch("/products", patchProduct)
.delete("/products", deleteProduct);
➔ ❄️ after MVC folder creation
// 📂 controller > productController.js

exports.getProduct = (req,res)=>{
    ...
};

exports.postProduct = (req,res)=>{
   ...
}

exports.putProduct = (req,res)=>{
    ...
}

exports.patchProduct = (req,res)=>{
    ...
}

exports.deleteProduct = (req,res)=>{
    ...
}
and
// 📂 routes > productRoutes.js

// requirements
const express = require("express");
const router = express.Router();
const productController = require("../controller/productController");

router
.get("/products", productController.getProduct)
.post("/products", productController.postProduct)
.put("/products", productController.putProduct)
.patch("/products", productController.patchProduct)
.delete("/products", productController.deleteProduct);

exports.router = router ;
and
// 📂 index.js

console.log("start");

// import from controller
const productController = require("./controller/productController");

// create server
const express = require("express");
const server = express();

//=============================================
// MIDDLEWARES
server.use(express.json());
// const morgan = require("morgan");
// server.use(morgan('default'));
server.use(express.static('public'));

// product router
const productRouter = require("./routes/productRoutes");
server.use("/", productRouter.router);

//server.use("/xxxx", productRouter);

//==========================================

server.listen(3000,()=>{
    console.log("server starts on 3000 port");
})%20(1)_page-0012.jpg)
%20(1)_page-0018.jpg)
❌Folder structure below
❌❌ ✅ IMP to understand folder structure -- link
➖➖➖➖➖➖➖➖➖➖➖➖➖➖➖
➖➖➖➖➖➖➖➖➖➖➖➖➖➖➖
➔ database, but it's not like traditional relational databases that use tables to store data. Instead, MongoDB is a NoSQL database that stores data in a format called BSON (Binary JSON) and uses a flexible structure known as "documents."
➔ No-Sql Db like mongoDb


- Database are topmost storage level of your data - mostly each application has 1 database - however complex application might have more than 1 databases. Database is something like university database
- There can be many collections inside a database - collection is a group of documents of similar kind - students, teachers, courses etc
- Finally document is basic entity of storage in Mongod, it looks very similar to an object in JSON. (However it is BSON)

➔ SQL Db

➔ after installation
➔ in cmd, open mongosh path and then run mongosh to run the mongosh
➔ show dbs to see all Dbs
➔ use <dbname> to open patricular Db
➔ use <notExistingDbName> to create new Db
➔ show collections to see the collections of selected Db
➔ Mongo DB community server comes with in-bulit Mongo CLI which can act as a terminal based client. You can use the CRUD functionality from here.
➔ Create Query (insertOne, insertMany)
db.<collectionName>.insertOne( newDocument )
db.<collectionName>.insertMany( documentArray )
➔ Read Query (find, findOne)
db.< collectionName >.find( filterObject ) -- to read all docs
db.< collectionName >.findOne( filterObject ) -- to read one document
db.< collectionName >.countDocuments( filterObject ) -- shows total number of documents

// filter Object === { fieldName : {operator: value}}
// fieldName : database fields name
// operator : $eq = equal , $gt= greater than, $lt : less than, $gte = greater than equal, $and and $or operator
// Value : what value we are comparing with operatorV
// { age : {$gt:5}}. - age is greater than value 5
➔ Update Query (updateOne)
db.< collectionName >.updateOne( filterObject, updateObject, options )

// update Objects = { $set : {field: value}}
// options : {upsert: true}

// Upsert : Update + Insert, when we want a new info to create a new obejcts if no existing object matches filter queries. -- update karo and aagar update condition match na ho toh insert kr do
// db.< collectionName >.replaceOne( filterObject, updateObject ) --- Overwrites other fields also which are not in updateObject.
➔ Delete Query (deleteOne, deleteMany)
db.< collectionName >.deleteOne( filterObject )➔ Delete database (drop)
🔥 all crud query explained = chatGpt
➔ ✔️ logical operators in query - chatGpt
➔ 🔆 cursor in query
db.collection_name.find({
    $or: [
            { price: {$gt: 100} },
            { id : {$gt : 3} }
         ]
})
.sort({ price : 1)
.limit(2)

// here after getting result we are using sort (array method) + limit is 2 here

// sort( {fieldName: 1}) : 1 for ascending -1 for descending
// limit( x ) : only gives x documents
➔ 🚀 Projection -
- Only return selected fields while returning result documents.
db.< collectionName >.find( filterObject, projectionObject )

// e.g. {name:1, age:1, id:0} - only show name and age and don't show id
➔ Hostname is Database server address - like localhost or db.xy.com . In mongoDB hostname generally uses mongodb protocol to connect. So URLs are generally are of shape : mongodb://localhost:27017
➔ setUp-video
➔ mongoDB atlas login
➔ top left -> drop down -> new project
➔ enter project name and create project
➔ build database clicked here
➔ select M0 plan which is marked as free and select Mumbai as region
➔ click create
➔ save username and password in notepad -> click create
➔ click finish and close
➔ on db click connect
➔ click compass
➔ copy connecting string and replace with your own that you have pased in notepad
"mongodb+srv://pptl8685:<password>@cluster0.ehycfhl.mongodb.net/<newDbName>"
➔ you can also connect this cloud DB with your mongoCompass app - just open app and there is a box where you can replace the "mongodb://localhost:27017" with the above atlas generated link which must have password and the newDbName and then click on connect
➔ 📕 ERROR solution - ip change ho jayegi to connect nhi hoga compass se toh uske liye ATLAS WEB open kro then security -> network access -> add current IP to solve the error
➔ To use environment variable we can use a npm package called dotenv which will create new process.env variables.
➔ Install dotenv using npm install dotenv
➔ create .env file in your root directory
➔ for usage call require('dotenv').config()
➔ and write like process.env.<variableName>
➖➖➖➖➖➖➖➖➖➖➖➖➖➖➖
➖➖➖➖➖➖➖➖➖➖➖➖➖➖➖
➔ Mongoose is a popular JavaScript library that is commonly used with Node.js to interact with MongoDB.
➔ npm install mongoose installation.
➔ connect mongoose
const mongoose = require('mongoose');

mongoose.connect('mongodb://127.0.0.1:27017/testDb',{
    useNewurlParser : true,
    useUnifiedTopology : true
})
.then(()=>{console.log("connection successfull between express server with mongoDB")})
.catch(()=>{console.log("error");
            //exit the application and indicate that it exited with an error + terminate your Node.js application programmatically when a specific error condition occurs
            process.exit(1);
           })

// mongoose.connect('mongodb://localhost/myNewdbName', { useNewUrlParser: true });
// mongoose.connect('mongodb://192.168.1.100:27017/myNewdbName', { useNewUrlParser: true });
// above both are same but aagar DB connect nhi ho rha toh -- 192.168.1.100:27017 try this one

// here testDb is db name that we have created in the mongodb compass%20(1)_page-0023.jpg)
✔️ Schema
➔ description of data
➔ each collection have some configurations - chatGpt
➔ schema means hum jaise sql me collumn name likh kar uski dataType define karte hai waise hee, idhar no-sql me hum create krte hai.
// schema
// OOP in js "new obj"

const Schema = mongoose.Schema ;
const productSchema = new Schema({
    title : String,        // String is shorthand of { type: String }
    description : String,
    price : Number,
});
➔ DataTypes in schema - String, Number, Date, Boolean, Mixed, ObjectId, Array
➔ you can also put conditions in schema
age: { type: Number, default:18, min: 18, max: 65, required :true }
// default value of Number is 18 and should be between 18-65, and can't be null or empty

//=============================
// other example

const userSchema = new Schema({
  username: { type: String, required: true, unique: true },
  email: { type: String, required: true },
  age: { type: Number, min:[18, "error that below 18"], max:[50,"eroor that above 50"] },
  createdAt : {type : Date, required : true, default : Date.now() },                     // Date.now() wala
  roles : { type : String, enum : ["Admin", "Student", "Visitor"] }    // enum - in teeno me se he koi ek value ho sakti hai

});
✔️ Model
➔ Model are similar to classes, they create a Class from Schema. These classes(i.e Models) can be used to create each new database object.
// 📂 model > product.js
const mongoose = require('mongoose');
const { Schema } =  mongoose;

const taskSchema = new Schema({
    title:  String,
    status: Boolean,
    date: { type: Date, default: Date.now },
  });

// create collection through model -- Create a model based on the schema
const Task = mongoose.model('Task', taskSchema);  //-- Task Model to create new database objects for `tasks` Collection
// model se ek new Collection create hoga named "Task" and taskSchema is the configuration for the "Task" collection
// and const Task ek variable hai and wo he ek new created collection hai
💫 Create new objects/data in collection
➔ To Create new obejct in database we can use new keyword and create an object from Model. We can use save() function to save the object in database. Unless, you call save function - the object remains in memory. If your collection not yet created in MongoDB, it will created with name of Model pluralized (e.g Task will make a collection named tasks)
server.post("/task",function(req,res){
    let task = new Task();             // here "new Task()" create a new task of model named Task
    task.title = "shopping";
    task.status = true;
    task.date = new Date();

    task.save();
    //=====OR
    task.save().then((doc)=>{console.log("saved",doc)}).catch((error)=>{console.log("not saved errorr",error)})
    //=====OR
    task.save((error,doc)=>{console.log({error,doc})})  //🎯 if this give error of " no longer accepts a callback " then use .then and .catch
})

//===================================
const {title, body} = req.body;
const post = new Post({
             title,body,
            });
const savedPost = await post.save();

//================================
const {title,desc} = req.body ;
const response = await Todo.create( {title,desc} );
💫 Read objects
➔ To read new obejcts from database, one can use find query or similar queries. find queries also contain some conditions which can restrict what kind of data objects you want to read from database.
server.get("/task/:name",function(req,res){
    task.findOne({name:req.params.name},function(err,doc){
        console.log(doc)  // this will contain db object
    })
})


server.get("/tasks",function(req,res){
    task.find({},function(err,docs){
        console.log(docs)  // this is an array which contains all task objects
    })
})

// task.find({id:{$gt:3});
// task.findById(2);
💫 Update - existing objects
➔ To Update an existing object in database we need to first find an object from database and then update in database. This might be considered as a combination of find and save methods.
➔ 2 cases in update
- Updating all values and overwriting the object properties completely.
- Updating only few values by setting their new values.
➔ First scenario is covered using this query. Here you are overwriting all properties and resulting object will only have name property.
server.put("/task/:name",function(req,res){
    Task.findOneAndReplace({name:req.params.name},{name:'YouStart'},{new:true},function(err,doc){
        console.log(doc)  // this will contain new db object
    })
})
➔ Second scenario is covered using this query. Here you are only changing value of name property in existing object without changing other values in Object.
server.put("/task/:name",function(req,res){
    Task.findOneAndUpdate({name:req.params.name},{name:'YouStart'},{new:true},function(err,doc){
        console.log(doc)  // this will contain db object
    })
})
➔ updating
const updatedNote = await Note.findByIdAndUpdate(
                id,
                {
                    title : title,
                    desc : desc ,
                    img : uploaded.secure_url,
                },
                { new: true }    // To return the updated document
            );

// here { new: true }  == To return the updated document
💫 Delete - existing objects
➔ To Delete existing object from database we need to first find an object from database and then delete. This might be considered as a combination of find and delete methods.
server.delete("/task/:name",function(req,res){
    Task.findOneAndDelete({name:req.params.name},function(err,doc){
        console.log(doc)  // this will contain deleted object object
    })
})%20(1)_page-0029.jpg)
🌌 summarized notes by coderDost
✅♻️ Take referance of one model to another model -- ⚡️ video link
// in POSTMODEL.JS in postSchema

likes : [{
            // MODEL ID
            type : Schema.Types.ObjectId,
            // model name which id we needs - ref to the post model
            ref : "Like"
        }],

// here [ ref : "Like" ] is reffering to the LIKE MODEL which is made based on like schema
// and [type : Schema.Types.ObjectId ] is pointing out to the ID of LIKE MODEL's items ID


comments : [{
            type: String ,
            ref : "Comment",
        }]

// here COMMENT MODEL is referance
// and comments type will be String%20(1)_page-0030.jpg)
➔ it gives the whole item insted of only ID
const updatedPost = await Post.findByIdAndUpdate(post, {$push : {comments : savedComment._id}}, {new: true})
                            .populate("comments") // populate the comments array with comment documents
                            .exec();

//.exec() explicitly allows you to provide a callback function for error handling and result processing, which can be very useful in more complex scenarios.
// we can avoid .exec()

// populate use nhi karenge toh "updatedPost" me sirf ID melegi
// populate("<objectPropertyName>")
// ...
        "comments": [
            "6538d97081fd589e898fbd43",
            "6538dab83facb4414d4f007b"
        ]
    }
}

// with populate
// ...
"comments": [
            {
                "_id": "6538d97081fd589e898fbd43",
                "post": "6538d80d1fcf5c62f583bc10",
                "user": "parth ptlk",
                "body": "upsstrial",
                "__v": 0
            },
            {
                "_id": "6538dab83facb4414d4f007b",
                "post": "6538d80d1fcf5c62f583bc10",
                "user": "parth ptlk",
                "body": "upsstrial",
                "__v": 0
            }]
⭕️♻️ try to understand this code
➔ here is the code- chatgpt
➖➖➖➖➖➖➖➖➖➖➖➖➖➖➖
➖➖➖➖➖➖➖➖➖➖➖➖➖➖➖
➔ Sending data from front-end to Server
- Fetch : it is in-built API in the browser
- Axios : we will use axios as it is easier to use.
🔹 CORS Issues :
➔ CORS - Cross-Origin Resource Sharing (CORS) is a standard that allows a server to relax the same-origin policy
➔ CORS - Cross-Origin Resource Sharing (CORS) is a standard that allows a server to relax the same-origin policy
➔ we will use CORS package to allow cross origin request from React JS server to NodeJS server as they are on different hosts.
➔ npm install cors
➔ to use cors
const cors = require('cors');
server.use(cors())
➔ ♻️ using axios all crud ops with db- chatgpt
➔ ♻️ using fetchApi all crud ops - chatGpt
const getAllData = async () => {
    try {
      const getPeople = await fetch(
        `${process.env.REACT_APP_BASE_URL}/getallUsers`,
        {
          method: "GET",
          headers: {
            "Content-Type": "application/json",
          },
        }
      );

      const res = await getPeople.json();
      setEmpData(res);
    } catch (error) {
      console.log(error);
    }
  };
➖➖➖➖➖➖➖➖➖➖➖➖➖➖➖
➖➖➖➖➖➖➖➖➖➖➖➖➖➖➖
➔ authn has to do with identity, or who someone is ( identity verification )
➔ while authz has to do with permissions, or what someone is allowed to do ( access rights and permissions )
➔ Ex. like i have website in which i have 3 Ui which are silver, gold, platinum so here if user loggedin when the process of identity verification comes, then it calls authentication and then i have to show the particular Ui to the loggedin user which is authorization ==> expalined in details below
➔ Authentication (Authn): When a user logs into your website, they provide their username and password or some other form of identity verification. This process confirms their identity, ensuring they are who they claim to be.
➔ Authorization (Authz): After authentication, you need to determine what the user is allowed to do or access within your website. In your case, you have three different levels of access: silver, gold, and platinum. This is where authorization comes into play. Depending on the user's identity and their access level, you decide which UI (silver, gold, or platinum) to show to the user. This is all about granting permissions based on their authenticated identity.


➔ Hashing VS encryption-decryption - chatGpt
➔ 💙 bcrypt for password encryption - chatGpt
const bcrypt = require("bcryptjs");            //🎯 bcrypt is not installing so used bcryptjs insted bcrypt -- so run npm i bcryptjs
const User = require("../models/User");

// signup route  handler
exports.signup = async (req, res) =>{
    try{
        // get data
        const {name, email, password, role} = req.body ;

        // if user already exist
        const existingUser = await User.findOne({email});

        if(existingUser){
            return res.status(400).json({
                success : false ,
                message : "user/email already exist" ,
            })
        }


        let hashedPassword ;
        try{
            // password encryption
            // secure password using BCRYPT = bcrypt.hash(<data>, <no of rounds>)
            hashedPassword = await bcrypt.hash(password, 10);
        }

        catch(error){
            return res.status(400).json(
                {
                    success : false ,
                    message : "error in hasing password" ,
                }
            )
        }

        // create user
        const user = await User.create({name, email, password:hashedPassword, role});

        return(
            res.status(200).json(
                {
                    success : true ,
                    message : `user created successfully - ${user}`
                }
            )
        )

    }

    catch(error){
       // something
    }

}
➔💜🔥 JWT - jsonwebtoken - chatGpt
//LOGIN

const bcrypt = require("bcryptjs");
const jwt = require("jsonwebtoken");  //  npm i jsonwebtoken


exports.login = async (req, res) =>{
    try{
        // data fetch
        const {email, password} = req.body ;

        // validation  -- email is empty or undefined (falsy), password is empty or undefined (falsy),
        if(!email || !password){
            return(
                res.status(400).json(
                    {
                        success : false ,
                        message : "please fill all the details ",
                    }
                )
            )
        };

        // check for already registered user
        const user = await User.findOne({email});
        // if user is not registered then
        if(!user){
            return(
                res.status(401).json(
                    {
                        success : false ,
                        message : "user is not registered"
                    }
                )
            )
        }

        // verify password and generate JWT token
        // bcrypt.compare(<real>, <hashed>) -- comparing
        if(await bcrypt.compare(password, user.password)){

            const payload = {
                email : user.email ,
                id : user._id ,
                role : user.role
            }

            // if password matched then
            // JWT me payload means "DATA" and secreateKey
            let token = jwt.sign(payload,
                                 process.env.JWT_SECRET,
                                 {
                                    expiresIn : "2h"
                                 }
                                );

            // user jo obj hai uske andar kar rahe hai niche ki 2line wo DB me change nhi ho rha
            // user.token = token ;
            // user.password = undefined ;

            // ye upar ki 2 line work nhi kar rhi so  -- user ko plain-OBJECT me convert kar rahe hai
            user = user.toObject();
            user.token = token ;
            user.password = undefined ;

            // cookie("<cookieName>", <jwtToken or Value>, options)
            const options = {
                expires : new Date(Date.now() + 3 * 24 * 60 * 60 * 1000),
                httpOnly : true,
            }
            res.cookie("token", token, options).status(200).json(
                {
                    success : true ,
                    token ,
                    user ,
                    message : "user logged in successfully" ,
                }
            )
        }
        else{
            return(
                res.status(403).json(
                    {
                        success : false ,
                        message : "password incorrect" ,
                    }
                )
            )
        }


    }
    catch(error){
        // error
    }
}-
cookies options imp -
https://projects.100xdevs.com/tracks/Auth/auth-5
➔🤎 🔥 Cookie Parser middleWare = chatGpt
// 📂 index.js

// cookie parser -
const cookieParser = require("cookie-parser");
app.use(cookieParser);

// 🎯 CORS error
const cors = require('cors');
app.use( cors({ origin: "*",}) );
💚🎯 AUTH APP IMP - codelink
💙🎯 for reference take this code - chatGpt
➖➖➖➖➖➖➖➖➖➖➖➖➖➖➖
➖➖➖➖➖➖➖➖➖➖➖➖➖➖➖
➔ Cloudinary - cloud based media management service where you can store media and you can access it through secured link.
➔ chatGpt
➔ How to get cloudinary api keys ? -- first go to the website named "cloudinary" then signup then go to setting ( bottom left ) then go to access key where you can find apiKey and apiSecret and from dashboard you can get everything
// 📂 config > cloudinary
const cloudinary = require("cloudinary").v2 ;

require("dotenv").config();

exports.cloudinaryConnect = () =>{
    try{
        cloudinary.config({
            cloud_name: process.env.CLOUD_NAME,
            api_key: process.env.API_KEY,
            api_secret: process.env.API_SECRET,
          });

        console.log("clodinary connection successful");
    }
    catch(error){
        console.log("error in cloudinary connection",error);
    }
}

// 📂 index.js
// cloudinary connecttion
const cloudinary = require("./config/cloudinary");
cloudinary.cloudinaryConnect();
➔ express-file upload middleware- middleware for uploading files on express server - link
// 📂 index.js

// file upload middleware - middleware for uploading files on server
const fileupload = require("express-fileupload");
app.use(fileupload({
    useTempFiles : true,
    tempFileDir : '/tmp/'
}));
➔ another fileUpload middleware == multer is also same for fileUpload
// 📂 index.js

const multer = require('multer');
// Use Multer middleware for handling form data
const upload = multer();
app.use(upload.any());
➔ then
// 📂 in controller

const cloudinary = require("cloudinary").v2 ;

//=====================================================
        //⚡️ getting imageFile
        // here "imageFile" is key
        const file = req.files.imageFile ;
        console.log(file);

        // 🔥 getting imageFile extension
        const fileType = file.name.split(".")[1].toLowerCase() ;
        console.log("filetype==>", fileType);

        // 🌈 validation on img types -- validation on data (file type is supported or not)
        async function checkValidation (){
            const supportedTypes = ["jpg", "jpeg", "png"];
            if(await supportedTypes.includes(fileType)){
                return true ;
            }
            else{
                return false;
            }
        }

        const validationAns = await checkValidation();
        console.log("validationAns=>",validationAns);
        if(!validationAns){
            return(
                res.json({
                    success : false ,
                    message : "not supported file types"
                })
            )
        }

        // 💥 uploading on cloudinary
        async function uploadFileToCloudinary(file, folder, quality){
            const options = {folder};

            if(quality){
                options.quality = quality ;
            }

            options.resource_type = "auto" ;

            // upload to cloudinary
            // file.tempFilePath -- means jab wo file client side se fetch hogi tab ek temporary path par save hogi express server k
            // then wo cloudinary par upload hone k baad automatically delete ho jayega

            return await cloudinary.uploader.upload(file.tempFilePath, options);
        }


        // upload to cloudinary (filefrom client, folder name of cloudinary, quality(10,20...,100))
        // quality is extra you can avoid it
        const uploaded = await uploadFileToCloudinary(file, "notesApp");
        console.log("uploaded img URL ==>", uploaded.secure_url);
➔ Test on PostMan = -- In the request body tab, select the "form-data" option. This is the option you'll use to upload files. -- Click on "Add key" to add a new key-value pair. -- Set the key to the name you want to use for the image file here "imageFile". -- Set the type of the value to "File" by using the dropdown menu. -- Choose the image file you want to upload by clicking on "Select Files." -- here you can also add other things like below img -

➖➖➖➖➖➖➖➖➖➖➖➖➖➖➖
➖➖➖➖➖➖➖➖➖➖➖➖➖➖➖
➖➖➖➖➖➖➖➖➖➖➖➖➖➖➖
➖➖➖➖➖➖➖➖➖➖➖➖➖➖➖
➖➖➖➖➖➖➖➖➖➖➖➖➖➖➖
➖➖➖➖➖➖➖➖➖➖➖➖➖➖➖
➖➖➖➖➖➖➖➖➖➖➖➖➖➖➖
➖➖➖➖➖➖➖➖➖➖➖➖➖➖➖
➔ postman's req is Undefined so here is solution
// FIRST -- middlewares ayenge
app.use(express.json());

// SECOND - then this
const routes = require("./routes/router");
app.use("/", routes);
➔ javascript Promises(.then/.catch ) VS Async Await EXPLAINED - vidLink
➔ we cannot send DATA in GET method of axios
  // `data` is the data to be sent as the request body
  // Only applicable for request methods 'PUT', 'POST', and 'PATCH'
so what to do -- avoid the usage of req.body in backend and use req.query
// FRONTEND CODE of AXIOS method with GET with req.query send
try {
    const res = await axios.get(`${backendUrl}/oneNote`, {
        params: {
            id: id
        }
    });
    console.log(res);
} catch(error) {
    console.log("error =>", error);
}

// ======================================
// BACKEND code to get something from req.query
const { id } = req.query;