Setting up push notifications
The Lithium Community iOS SDK supports Apple Push Notification (APNs) and Firebase Cloud Messaging (FCM) for push notifications.
Ensure that your Community team has requested push notification enablement for your Community from askonboarding@lithium.com to request. Without enablement, you will not be able to complete the tasks in this guide.
This guide assumes:
For APNs:
- (APNs) You have enabled the Push Notification capability for your project in Xcode
- (APNs) You have created an authorization token signing key via your Apple Developer account to communicate with APNs
- (APNs) You have created your app configuration in Community Admin (See Getting Started with the Community iOS SDK)
For Firebase:
- (FCM) You have a Firebase project for your native Android app
- (FCM) You have connected the Firebase Console to Play Store Console
- (FCM) You have created your app configuration in Community Admin (See Getting Started with the Community iOS SDK)
Note: The Community iOS SDK supports token-based provider connection.
This section describes how to:
- Link APNs to Lithium Community
- Register your app to receive notifications
- Prepare to receive notifications
- Create alert text strings for your app
- Create a payload
To add your authentication token to Community Admin:
- Log into Community and open Community Admin > System > API Apps.
- Click Edit to edit your app configuration (or click Create if you have not yet set up your app in Community Admin).
- Select APNS from the Push Notification Adapter drop-down.
- Add the following:
- Push Notification Key ID - the APNS_KEY_ID found in the .p8 file generated from the APNs Auth Key page in your Apple Developer Center
- Push Notification Auth Key - the string value of APNS_AUTH_KEY in the .p8 file
- Push Notification Team ID - the TEAM_ID from the .p8 file
- Push Notification Topic ID - the bundle ID of your app
- Click Save.
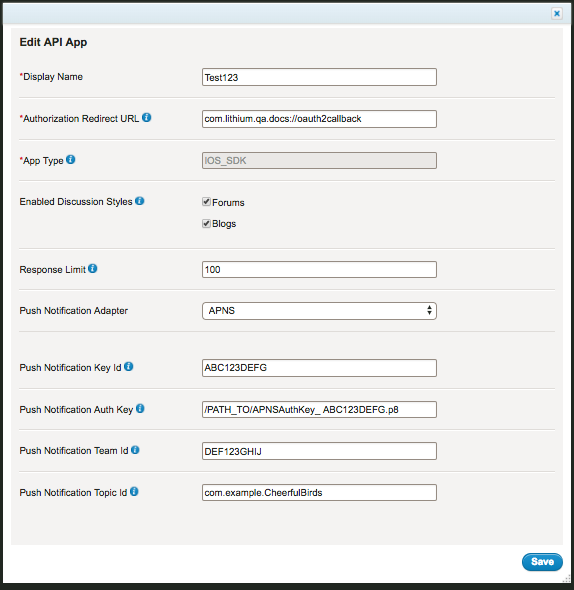
APNs is now enabled for your Community integration.
As described in Apple's Local and Remote Notification Programming Guide, you configure support for remote notifications at launch no later than the application:didFinishLaunchingWithOptions: method of your project's UIApplication delegate.
- Your app will ask to register with APNs
- Upon successful registration, APNs returns an app-specific device token to the user's device
- Your app sends the token to your notification server provider
Note: Never cache the device token. Retrieve a new device token whenever needed.
To obtain the device token:
Initiate registration with APNs using the registerForRemoteNotifications method of the UIApplication object during app launch. Upon success, iOS receives the token and forwards it to your notification service provider.
Your code will look something like this:
func application(_ application: UIApplication,
                 didFinishLaunchingWithOptions launchOptions: [UIApplicationLaunchOptionsKey: Any]?) -> Bool {
    // Configure the user interactions first.
    self.configureUserInteractions()

    // Register with APNs
    UIApplication.shared.registerForRemoteNotifications()
}

// Handle remote notification registration.
func application(_ application: UIApplication,
                 didRegisterForRemoteNotificationsWithDeviceToken deviceToken: Data){
    // Forward the token to your provider, using a custom method.
    self.enableRemoteNotificationFeatures()
    self.forwardTokenToServer(token: deviceToken)
}

func application(_ application: UIApplication,
                 didFailToRegisterForRemoteNotificationsWithError error: Error) {
    // The token is not currently available.
    print("Remote notification support is unavailable due to error: \(error.localizedDescription)")
    self.disableRemoteNotificationFeatures()
}
Add a callback similar to the example below in AppDelegate.swift. It will be invoked when your app receives a push notification from your notification server:
// Push notification received
func application(_ application: UIApplication, didReceiveRemoteNotification data: [AnyHashable : Any]) {
    // Print notification payload data
    print("Push notification received: \(data)")
}
A callback like this is invoked only when a user has interacted with your push notification (tapped or swiped) from the lock screen/Notification Center, or if your app was open when the push notification was received by the device.
The actual logic to execute upon interaction is up to you. For example, an Accepted Solution push notification might take the user to the accepted post.
Create the following keys in your project's Localizable.strings file for each language you support.
| Key | Definition | Example |
|---|---|---|
| LiKudoAlertTitle | The title of the alert sent when a user receives kudos in the community | "LiKudoAlertTitle" = "You Got Kudos!"; |
| LiKudoAlertBody | The body of the kudos alert | "LiKudoAlertBody" = "%@ kudoed your message"; |
| LiMessageAlertTitle | The title of the alert sent when some replied to a user's post | "LiMessageAlertTitle" = "Reply"; |
| LiMessageAlertBody | The body of the reply alert | "LiKudoAlertBody" = "%@ replied to your message"; |
| LiSolutionAlertTitle | The title of the alert sent when a user's post is accepted as a solution | "LiSolutionAlertBody" = "%@ accepted your post as a solution"; |
| LiSolutionAlertBody | The body of the accepted solution alert | "LiSolutionAlertBody" = "%@ accepted your post as a solution"; |
| LiTopicAlertTitle | The title of the alert sent when a new topic message is posted to a board the user subscribes to. | "LiTopicAlertTitle" = "New Topic Posted"; |
| LiTopicAlertBody | The body of the alert sent when a new topic message is posted to a board the user subscribes to. |
mPushy generates and sends the payload for you based on keys and arguments defined in a dictionary called aps. The following table lists the title-loc-key, loc-key, and loc-args required for each type of notification supported by the Community iOS SDK. Notice that title-loc-key and loc-key pull their value from the localized strings you created in Create alert text strings for your app.
| Notification Type | title-loc-key | loc-key | loc-args |
|---|---|---|---|
| kudos | LiKudoAlertTitle | LiKudoAlertBody | Name of the person who gave the kudo |
| messages | LiMessageAlertTitle | LiMessageAlertBody | Name of the person who replied to the message |
| solutions | LiSolutionAlertTitle | LiSolutionAlertBody | Name of the person who accepted the message as a solution |
| topic | LiTopicAlertTitle | LiTopicAlertBody | Name of the person who replied to the topic |
Here is an example aps dictionary used for a Kudos alert. The source, type, message, from, and fromId entries are Community app-specific data required by your app for the alert. The app-specific keys are the same for every notification type.
Note: The examples include whitespace and line breaks for readability. As a best practice, omit whitespace and line breaks to reduce the size of the payload.
{
    "aps" : {
        "alert" : {
        	"title-loc-key": "LiKudoAlertTitle",
            "loc-key" : "LiKudoAlertBody",
            "loc-args" : ["John"]
        }
    },
    "from": "userPro50S8szy",
    "source": "community",
    "type": "kudos",
    "message": "{\"notificationType\":\"STANDARD\",\"eventTransactionId\":\"5acaac44-a818-4937-babf-025a9cd3f23b\",\"eventTimeUUID\":\"8594b270-cbea-11e7-891c-5254008bb56a\",\"eventSummary\":{\"subscriptionType\":\"KUDOS\",\"eventTransactionId\":\"5acaac44-a818-4937-babf-025a9cd3f23b\",\"eventTime\":1510959378199,\"kudoerId\":567,\"entityId\":749,\"entityKey\":\"message\",\"kudoWeight\":1}}",
    "fromId": "567"
}
This section describes how to:
This section describes how to create the bridge between Firebase and your Community application so that Firebase directs notifications from Community to your native app. You'll need to generate a server key in Firebase and add that server key to Community Admin.
To generate the key:
- In the Firebase console, go to Settings > Cloud Messaging for your app.
- Look for the Legacy Server Key.
- Log into Community and open Community Admin > System > API Apps.
- Click Edit to edit your app configuration (or click Create if you have not yet set up your app in Community Admin).
- Select the Options checkbox.
- In the Push Notification Server Key field, enter the legacy server key from the Firebase Console.
- Click Save.

At this point, you have enabled Firebase push notifications for your Community integration. See the Firebase documentation for instructions to register for remote notifications and access registration tokens.